1. 搭建爬虫环境
如果是在Linux操作系统下,建议建立一个私人的python开发环境
可以virtalenv也可以用anaconda/miniconda
注意:由于树莓派系统是基于ARM架构,在一些软件/安装包的安装上可能会出现一些问题
1.1. 树莓派中安装Anaconda/Miniconda
树莓派的CPU是基于ARM构架,不同于常用的Intel的X86构架,因此在Anaconda/Miniconda官网上直接下载的安装文件,在树莓派上安装会报错,此时的解决方案是获取专门为ARM编写的安装文件:
1 | $ wget http://repo.continuum.io/miniconda/Miniconda3-latest-Linux-armv7l.sh |
1.2. 安装请求库
1.2.1. 安装requests、selenium:pip
用pip安装python包,若安装失败,可以尝试升级pip
升级pip的方法:
2
3
4
>
>$ sudo python get-pip.py
>
安装requests
1 | $ pip3 install requests |
安装Selenium
1 | $ pip3 install selenium |
1.2.2. 安装浏览器驱动
然后要安装浏览器驱动,Chrome用ChromeDriver,Firefox用GeckoDriver
- ChromeDriver
先确定当前使用的Chrome浏览器的版本,然后到google官网上下载对应版本的ChromeDriver,并将其文件路径添加到环境变量中
在Windows中添加环境变量的方法:
计算机 => 属性 => 高级系统设置 => 环境变量 => 系统变量中选择”Path” => 点击下方的编辑 => 在Path环境变量后继续追加路径,用分号分隔
- GeckoDriver
Github地址: https://github.com/mozilla/geckodriver
在README主页上寻找release链接,打开后找到适合当前Firefox浏览器版本的文件下载下来
然后与ChromeDriver的操作类似,并将其文件路径添加到环境变量中
测试 ChromeDriver / GeckoDriver
先启动浏览器驱动:


然后在python交互环境中,通过命令尝试打开一个空白浏览器界面
1 | from selenium import webdriver |
使用ChromeDriver和GeckoDriver我们就可以利用浏览器进行网页的抓取,但是这样可能有个不方便的地方:程序运行过程中需要一直开着浏览器,在爬取网页的过程中浏览器可能一直动来动去。所以这个时候还有另外一种选择——安装一个无界面浏览器:PantomJS
- PantomJS
PhantomJS是一个无界面的、可脚本编辑的WebKit浏览器引擎
Selenium支持PhantomJS,运行的时候不会再弹出一个浏览器界面了
PhantomJS官网:http://phantomjs.org/,Windows下安装过程如上
Linux下基于源码的安装方法:
1 | # 获取source code |
也可以基于apt进行一键式安装(推荐):
1 | $ sudo apt-get install phantomjs |
也可以从 PhantomJS 官网上下载 PhantomJS 的 Linux 二进制包
测试PantomJS
1 | from selenium import webdriver |
1.2.3. 异步web服务:aiohttp
之前提到的requests是一个阻塞式HTTP请求库,当发送一个请求后程序会一直等待服务器响应,知道得到响应才会进行下一步处理,这样很耗费时间
aiohttp则是一个提供异步web服务的库
1 | pip install aiohttp |
另外,官方还推荐安装如下两个库:
- cchardet 字符编码检测库
- aiodns 加速DNS解析库
1 | pip install cchardet aiodns |
1.3. 安装解析库
抓取网页后要做的是从网页中提取信息。提取信息的方式多种多样,可以使用正则表达式来提取,但是写起来比较繁琐。可以使用许多强大的解析库,此外还提供了强大的解析方法,如XPath解析和CSS选择器解析
- lxml
lxml支持HTML和XML的解析,支持XPath解析方式
1 | pip install lxml |
- Beautiful Soup
lxml支持HTML和XML的解析,其依赖于lxml
1 | pip install beautifulsoup4 |
验证:
1 | from bs4 import BeautifulSoup |
注意:虽然安装的是beautifulsoup4这个包,但是在引入的时候确实bs4,这是因为这个包源代码本身的库文件夹名称就是bs4
- pyquery
pyquery提供了和jQuery类似的语法来解析HTML,支持CSS选择器
1 | pip install pyquery |
- tesserocr / pytesseract
在爬虫过程中难免会遇到各种各样的验证码,而大多数的验证码还是图像验证码,这时我们可以使用OCR来是识别
OCR,即 Optical Character Recognition,光学字符识别,是指通过扫描字符,通过其形状将其翻译成电子文本的过程。
对应网页中的验证码,我们可以使用OCR技术将其转化为电子文本,然后爬虫将识别结果提交给服务器,从而达到自动识别验证码的过程
tesserocr使Python的OCR识别库,但其实是对tesseract的一层Python API封装,它的核心是tesseract。因此在安装tesserocr之前,需要先安装tesseract
1、安装tesseract
- windows
下载地址:
https://digi.bib.uni-mannheim.de/tesseract/注意:安装的时候要勾选Additional language data(download),来安装OCR识别支持的语言包,这样OCR就可以识别多国语言
- Linux
在linux下安装tesseract
2
3
4
5
6
7
8
9
10
11
12
13
14
15
> $ sudo apt-get install tesseract-ocr libtesseract-dev libleptonica-dev
>
> # 用conda安装
> $ conda install -c bioconda tesseract
>
> # 从源码安装
> wget https://github.com/tesseract-ocr/tesseract/archive/3.05.01.tar.gz
> tar -zxvf 3.05.01.tar.gz
> cd tesseract-3.05.01
> ./autogen.sh
> PKG_CONFIG_PATH=/usr/local/lib/pkgconfig LIBLEPT_HEADERSDIR=/usr/local/include ./configure --with-extra-includes=/usr/local/include --with-extra-libraries=/usr/local/lib
> LDFLAGS="-L/usr/local/lib" CFLAGS="-I/usr/local/include" make
> make install
>
添加语言库
2
3
> cp tessdata/* /usr/share/tesseract-ocr/
>
测试tesseract


1 | $ tesseract image-english.png result -l eng |
2、安装tesserocr / pytesseract
1 | # 安装tesserocr |
若安装失败,可以尝试使用conda
1 | > conda install -c simonflueckiger tesserocr |
测试tesserocr
1 | import tesserocr |
1.4. 安装爬虫框架
1.4.1. pyspider
pyspider是国人binux编写的强大的网络爬虫框架
pyspider支持JavaScript渲染,而这个过程依赖于PhantomJS,所以需要同时安装好PhantomJS
1 | pip install pyspider |
测试,直接在命令行下执行:spider all,出现如下输出:

这时pyspider的Web服务就会在本地的5000端口运行,直接在浏览器中打开http://localhost:5000即可进入pyspider的WebUI管理界面

1.4.2. Scrapy
Scrapy是一个十分强大的爬虫框架,依赖的库比较多,至少包括Twisted、lxml和pyOpenSSL,此时使用conda进行安装最为方便
1 | $ conda install Scrapy |
测试:在命令行输入scrapy,若输出帮助文档则说明安装成功
1.4.3. Scrapy-Splash
Scrapy-Splash是一个Scrapy中支持的JavaScript渲染工具
Scrapy-Splash的安装分为两部分:
Splash服务的安装
安装Scrapy-Splash的Python库
- 安装Splash服务
Splash介绍:
Splash是一个Javascript渲染服务。它是一个实现了HTTP API的轻量级浏览器,Splash是用Python实现的,同时使用Twisted和QT。Twisted(QT)用来让服务具有异步处理能力,以发挥webkit的并发能力。
为了更加有效的制作网页爬虫,由于目前很多的网页通过javascript模式进行交互,简单的爬取网页模式无法胜任javascript页面的生成和ajax网页的爬取,同时通过分析连接请求的方式来落实局部连接数据请求,相对比较复杂,尤其是对带有特定时间戳算法的页面,分析难度较大,效率不高。而通过调用浏览器模拟页面动作模式,需要使用浏览器,无法实现异步和大规模爬取需求。鉴于上述理由Splash也就有了用武之地。一个页面渲染服务器,返回渲染后的页面,便于爬取,便于规模应用。
从splash网站上看,splash是容器安装的,Docker 是一个开源的应用容器引擎,在安装splash之前需要先安装好docker
1、在Windows上安装Docker
到Docker官网上下载安装包,官网默认用户使用的是Window10,若不是则需要下载 Dock Toolbox
2、Linux中安装Docker
1 | # 用apt安装 |
2. 爬虫基本库的使用
2.1. urllib
urllib包含以下3个主要模块:
- request 最基本的HTTP请求模块,可以用来模拟发送请求
- error 异常处理模块,如果出现请求错误,可以捕获这些异常,然后进行重试或者其他操作以保证程序不会意外终止
- parse 一个工具模块,提供了许多URL处理方法,比如拆分解析、合并等
2.1.1. 发送请求
1、urlopen
基本用法
利用最基本的urlopen( )方法,可以完成最基本的简单网页的GET请求抓取
1
2
3
4import urllib.request
response = urllib.request.urlopen('https://www.python.org')
print(response.read().decode('utf-8'))查看响应类型:
1
2
3type(response)
<class 'http.client.HTTPResponse'>一些方法的使用:
1
2
3
4
5
6
7
8>>> print(response.status)
200
>>> print(response.getheaders())
[('Server', 'nginx'), ('Content-Type', 'text/html; charset=utf-8'), ('X-Frame-Options', 'SAMEORIGIN'), ('x-xss-protection', '1; mode=block'), ('X-Clacks-Overhead', 'GNU Terry Pratchett'), ('Via', '1.1 varnish'), ('Content-Length', '48809'), ('Accept-Ranges', 'bytes'), ('Date', 'Fri, 17 Aug 2018 06:31:57 GMT'), ('Via', '1.1 varnish'), ('Age', '3242'), ('Connection', 'close'), ('X-Served-By', 'cache-iad2145-IAD, cache-hkg17926-HKG'), ('X-Cache', 'HIT, HIT'), ('X-Cache-Hits', '9, 10'), ('X-Timer', 'S1534487518.955612,VS0,VE0'), ('Vary', 'Cookie'), ('Strict-Transport-Security', 'max-age=63072000; includeSubDomains')]
>>> print(response.getheader('Server'))
nginx传递参数
data参数:添加额外数据
1
2
3
4
5
6import urllib.parse
import urllib.request
data = bytes(urllib.parse.urlencode({'word':'hello'}),encoding='utf-8')
response = urllib.request.urlopen('http://httpbin.org/post',data=data)
print(response.read())timeout参数:设置超时时间,单位为秒
1
response = urllib.request.urlopen('http://httpbin.org/get',timeout=0.1) # 按常理,0.1秒是基本不可能得到服务器响应的
出现以下报错信息:
1
2
3
4
5
6Traceback (most recent call last):
File "<stdin>", line 1, in <module>
File "/home/pi/miniconda3/lib/python3.4/urllib/request.py", line 161, in urlopen
return opener.open(url, data, timeout)
...
urllib.error.URLError: <urlopen error timed out>其抛出的是URLError异常
可以利用try excep语句来实现,若长时间没有响应就跳过它的抓取
1
2
3
4
5
6
7
8
9import socket
import urllib.request
import urllib.error
try:
response = urllib.request.urlopen('http://httpbin.org/get',timeout=0.1)
except urllib.error.URLError as e:
if isinstance(e.reason,socket.timeout):
print('TIME OUT')
2、Request
利用urlopen( ) 方法可以实现最基本的请求发起,但是这几个简单的参数还不足够构建一个完整的请求,如果想在请求中加入Header等信息,可以利用Request:
1 | import urllib.request |
依然使用的是urlopen( ) 来发生请求,只不过这次该方法的参数不再是URL,而是一个Request类型对象
构造Request对象:
1 | urllib.request.Request(url,data=None,headers={},origin_req_host=None,method=None) |
3、高级用法
处理高级操作:Cookies处理,代理设置等等
需要使用到Handler工具,它是urllib.request模块里的BaseHandler类,它是所有Handler的父类
其中一个重要的Handler类是OpenerDirector类,可以称之为Opener
验证
有些网站在打开的时候会弹出提示框,直接提示你输入用户名和密码,验证成功后才能查看页面
如果要请求这样的页面,需要借助 HTTPBasicAuthHandler
1
2
3
4
5
6
7
8
9
10
11
12
13
14
15
16
17
18from urllib.request import HTTPPasswordMgrWithDefaultRealm,HTTPBasicAuthHandler,build_opener
from urllib.error import URLError
username = 'username'
password = 'password'
url = 'https://...'
p = HTTPPasswordMgrWithDefaultRealm()
p.add_password(None,url,username,password)
auth_handler = HTTPBasicAuthHandler(p)
opener = build_opener(auth_handler)
try:
result = opener.open(url)
html = result.read().decode('utf-8')
print(html)
except URLError as e:
print(e.reason)代理
1
2
3
4
5
6
7
8
9
10from urllib.error import URLError
from urllib.request import ProxyHandler,build_opener
proxy_handler=ProxyHandler({'http':'http://localhost:9743','https':'https://localhost:9743'})
opener=build_opener(proxy_handler)
try:
response=opener.open('https://www.baidu.com')
print(response.read().decode('utf-8'))
except URLError as e:
print(e.reason)Cookies
1
2
3
4
5
6
7
8import http.cookiejar, urllib.request
cookie = http.cookiejar.CookieJar()
handler = urllib.request.HTTPCookieProcessor(cookie)
opener = urllib.request.build_opener(handler)
response = opener.open('http://www.baidu.com')
for item in cookie:
print(item.name+"="+item.value)
2.1.2. 处理异常
在发送请求后可能出现异常,如果不处理这些异常,程序很可能因报错而终止,所以异常处理十分必要
urllib的error模块定义了由request模块产生的异常,如果出现了问题,request模块便会抛出error模块中定义的异常:
URLError和HTTPError类,其中HTTPError类URLError类的子类
URLError
1 | from urllib import request, error |
HTTPError
1 | from urllib import request,error |
通常会先去捕获子类的错误,再去捕获父类的错误
1 | from urllib import request, error |
2.1.3. 解析链接
1、 urlparse
该方法可以实现URL的识别和分段:
1 | from urllib.parse import urlparse |
2、 urlunparse
它是作业与urlparse相反,其接受的参数长度必须为6
1 | from urllib.parse import urlunparse |
3、urlsplit
与urlparse相似,不过它不再单独解析parms这一部分,只返回5个结果
1 | from urllib.parse import urlsplit |
4、urlunsplit
与urlunparse相似,唯一区别是长度必须是5
1 | from urllib.parse import urlunsplit |
5、urljoin
用法:urljoin(url_1,url_2)
提供一个base_url作为第一个参数,将新的链接作为第二个参数,该方法会解析base_url的scheme、netloc和path这3个内容并对新链接缺失的部分进行补充
1 | from urllib.parse import urljoin |
输出
1 | http://www.baidu.com/FAQ.html |
6、urlencode
它在构造GET请求参数的时候非常有用
1 | from urllib.parse import urlencode |
urlencode( )方法可以将字典形式的变量序列化,转化为GET请求的参数
7、parse_qs
有了序列化,自然就有反序列化
1 | from urllib.parse import parse_qs |
8、quote
URL中带有中文参数时,可能会导致乱码的问题,此时需要将中文字符转化为URL编码
1 | from urllib.parse import quote |
2.1.4. 分析Robots协议
每个网站的Robots协议一般保存在站点的根目录下的robots.txt文件中
例如:
1 | User-agent: Baiduspider |
可以使用robotparser模块解析robots.txt
1 | from urllib.robotparser import RobotFileParser |
2.2. requests
urllib在使用过程中有一些不方便的地方,比如处理网页页面验证和Cookies时,需要写Opener和Handler来处理
requests可以更加方便的实现这些操作
2.2.1. 基本用法
1 | import requests |
有时需要构造header,否则无法正常请求
1 | headers = { |
- 抓取网页,然后用正则表达式进行匹配
1 | import requests |
- 抓取二进制数据
1 | import requests |
以字符串形式直接打印会乱码: print(r.text)
以二进制形式打印:
1 | print(r.content) |
- 响应
requests提供了一个内置的状态码查询对象requests.codess,可以用来判断请求是否成功
1 | import requests |
2.2.2. 高级用法
2.2.2.1. 文件上传
1 | import requests |
2.2.2.2. Cookies
获取Cookies
1 | import requests |
可以将Cookies在发送请求时加入headers中维持登录状态
1 | import requests |
也可以通过cookies参数来设置,不过这需要构造一个RequestsCookieJar对象
1 | import requests |
2.2.2.3. 会话维持
在requests中,如果直接用get( ) 或post( )方法的确可以做到模拟网页的请求,但实际上相当于不同的会话
设想一个这样的场景:
第一个请求用post( ) 方法登录了某个网站,第二次想获取成功登录后的个人信息,你又用了一次get( ) 方法去请求个人信息的页面。实际上这相当于打开了第二个浏览器,是完全不同的会话,肯定不能获得你想要的个人信息
1 | import requests |
用session试试:
1 | import requests |
2.2.2.4. SSL证书验证
当发送HTTP请求的时候,它会检查SSL证书,我们可以使用verify参数控制是否检查次证书。默认会自动进行证书检查
测试12306网站的SSL证书
1 | import requests |
关闭自动认证:
1 | response = requests.get('https://www.12306.cn', verify=False) # 虽然关闭了认证,但任然会给出一条警告信息 |
屏蔽警告信息的方法:
1、
1 | import requests |
2、
1 | import logging |
我们也可以指定本地的认证证书
1 | import requests |
2.2.2.5. 代理设置
1 | import requests |
若代理需要使用HTTP Basic Auth,可以使用类似 http://user:password@host:port 这样的语法来设置代理
1 | import requests |
2.2.2.6. 身份认证
在访问网站时,可能会遇到认证界面,此时可以使用requests自带的身份认证功能
1 | import requests |
更简单的写法(不需要传入一个HTTPBasicAuth类):
1 | import requests |
2.2.2.7. Prepared Request
如同urllib中提到的,我们可以将请求表示为数据结构,这个数据结构就叫 Prepared Request
1 | from requests import Request, Session |
2.3. 正则表达式
Python的re库提供了整个正则表达式的实现
1、 match( )
match( )方法会尝试从字符串的起始位置匹配正则表达式
如果匹配就返回匹配成功的结果;如果不匹配,就返回None
1 | match(regex, str) |
匹配得到的结果是一个SRE_Match对象,该对象有两个方法:
group( ):输出匹配到的内容
span( ):输出匹配的范围
2、匹配目标
如果想从字符串中提取一部分内容,可以使用括号( )将想提取的子字符串括起来
1 | import re |
3、贪婪与非贪婪
.*贪婪匹配
.*?非贪婪匹配
贪婪匹配
1 | import re |
非贪婪匹配
1 | import re |
4、修饰符
. 匹配的是除换行符之外的任意字符,当遇到换行符时,.*?就不能匹配了,所以导致匹配失败
1 | import re |
这时,只需要添加一个修饰符 re.S
1 | result = re.match('^He.*?(\d+).*?Demo$', content,re.S) |
修饰符 re.S 的作用是使 . 匹配包括换行符在内的所有字符
这个 re.S 在网页匹配中经常使用,因为HTML节点经常会有换行,加上它,就可以匹配节点与节点之间的换行了
其他常用的修饰符:
| 修饰符 | 描述 |
|---|---|
| re.I | 使匹配对大小写不敏感 |
| re.S | 使 . 匹配包括换行符在内的所有字符 |
5、search
match( )方法是尝试从字符串的起始位置匹配正则表达式,一旦开头不匹配,那么整个匹配就失败了
1 | mport re |
另外一个方法search( ),它在匹配时会扫描整个字符串,然后返回第一个成功匹配的结果。因此未来匹配方便,我们可以尽量使用search( )方法
实例:
提取class为active的li节点内部超链接包含的歌手名和歌名
2
3
4
5
6
7
8
9
10
11
12
13
14
15
16
17
18
19
20
21
22
23
24
25
26
27
>
> html = '''<div id="songs-list">
> <h2 class="title">经典老歌</h2>
> <p class="introduction">
> 经典老歌列表
> </p>
> <ul id="list" class="list-group">
> <li data-view="2">一路上有你</li>
> <li data-view="7">
> <a href="/2.mp3" singer="任贤齐">沧海一声笑</a>
> </li>
> <li data-view="4" class="active"> # 提取范围
> <a href="/3.mp3" singer="齐秦">往事随风</a> # 提取范围
> </li>
> <li data-view="6"><a href="/4.mp3" singer="beyond">光辉岁月</a></li>
> <li data-view="5"><a href="/5.mp3" singer="陈慧琳">记事本</a></li>
> <li data-view="5">
> <a href="/6.mp3" singer="邓丽君"><i class="fa fa-user"></i>但愿人长久</a>
> </li>
> </ul>
> </div>'''
>
> results = re.findall('<li.*?active.*?singer="(.*?)">(.*?)</a>', html, re.S)
> if result:
> print(result.group(1),result.group(2)
>
输出:
2
>
6、findall
findall( )方法会搜索整个字符串,然后返回匹配正则表达式的所有内容
还是上面的HTML文本,获取所有的a节点的超链接、歌手和歌名
1 | results = re.findall('<li.*?href="(.*?)".*?singer="(.*?)">(.*?)</a>', html, re.S) |
7、sub
使用正则表达式修改文本。可以使用字符串的replace( )方法,但是这样做太繁琐了,这时可以使用sub( )方法
实例:将所有数字去掉
1 | import re |
上面的HTML文本中,可以先用sub( )方法将a节点去掉,只留下文本,然后再利用findall( )提取
1 | html = re.sub('<a.*?>|</a>', '', html) |
8、compile
compile( )方法可以将正则字符串编译成正则表达式对象,以便在后面的匹配中复用
1 | import re |
2.4. 实战:爬取猫眼电影排行
1、网页分析
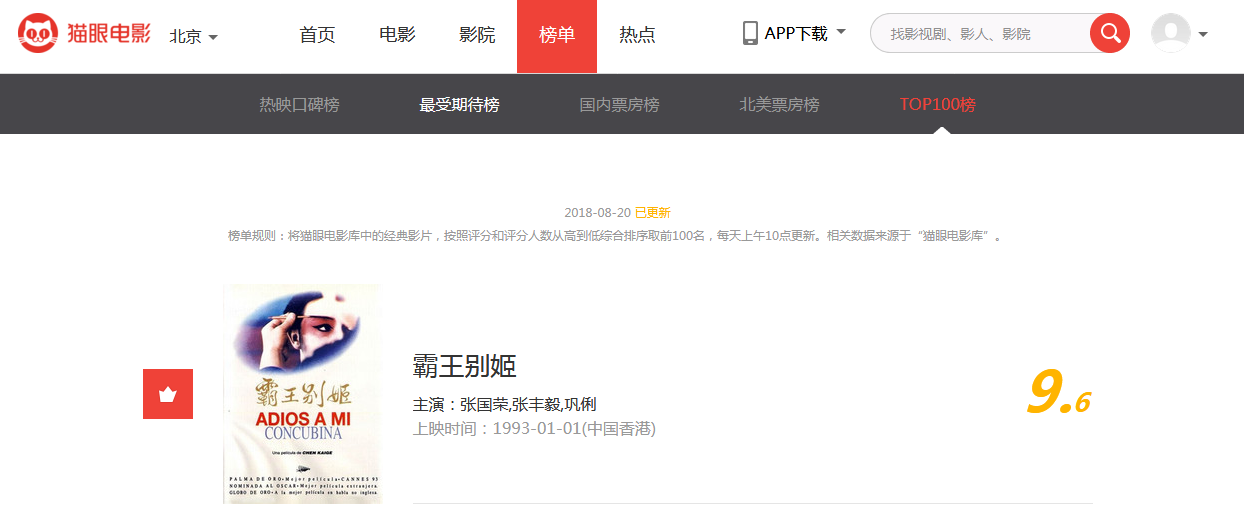
目标站点为http://maoyan.com/board/4

翻到下一页后URL变为:http://maoyan.com/board/4?offset=10
可以看到这个比之前那个URL多了一个参数offset=10,初步推断为一个偏移量的参数
2、抓取首页
1 | import requests |
3、正则提取

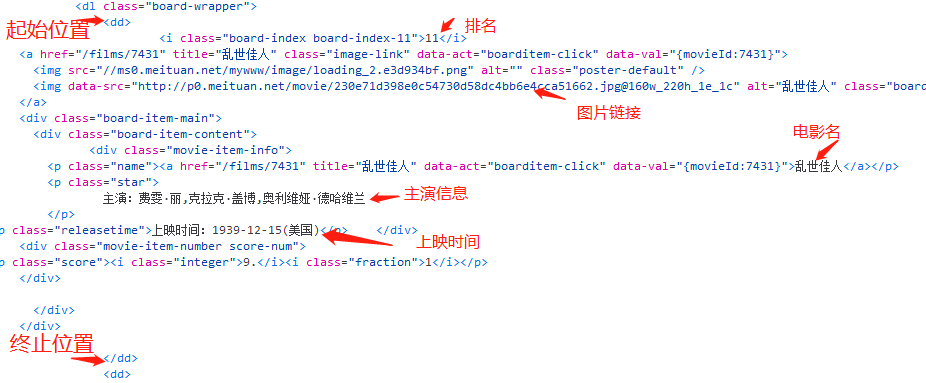
根据网页源代码,编辑正则表达式进行正则提取
1 | def parse_one_page(html): |
4、写入文件
通过JSON库的dumps( )方法实现字典的序列化,并指定ensure_ascii参数为False,这样可以保证输出结果是中文形式而不是Unicode编码
1 | def write_to_file(content): |
5、整合代码
1 | def main(): |
6、分页爬取
1 | if __name__ == '__main__': |
对main()方法稍作修改,接受一个offset值作为偏移量
1 | def main(offset): |
3. 解析库的使用
使用正则表达式提取页面信息,比较繁琐
对于网页的节点来说,它可以定义id、class或其他属性。而且节点之间还有层次关系,在网页中可以通过XPath或CSS选择器来定位一个或多个节点。那么在页面解析的时候,利用XPath或CSS选择器来提取某个节点,然后再调用相应的方法获取它的正文内容或属性,就可以提取我们想要的任意信息了
3.1. 使用XPath
需要使用到lxml库
XPath常用规则:
| 表达式 | 描述 |
|---|---|
| / | 从当前节点选择直接子节点 |
| // | 从当前节点选择子孙节点 |
| . | 选择当前节点 |
| .. | 选择当前节点的父节点 |
| @ | 选取属性 |
1 | from lxml import etree |
1、选取所有节点
1 | html.xpath('//*') |
2、选取所有的 li 节点
1 | html.xpath('//li') |
3、选取所有 li 节点下的 a 节点(a节点是li节点的直接子节点)
1 | html.xpath('//li/a') |
4、选取ul节点下的a节点(a节点不是ul节点的直接子节点)
1 | html.xpath('//ul//a') |
由于a节点不是ul节点的直接子节点,所以如果用//ul/a就无法获得任何结果
5、父节点:选取href属性为link4.html的a节点的父节点,然后获取它的class属性
1 | html.xpath('//a[@class="link4.html"]/../@class') |
也可以通过parent::来获取父节点
1 | html.xpath('//a[@class="link4.html"]/parent::*/@class') |
6、文本获取
使用XPath的text( )方法,利用获取节点中的文本
例如提取以下两个class属性值为 item-0 的 li 节点中的文本:
1 | <li class="item-0"><a href="link1.html">first item</a></li> |
若用//li[@class="item-0"]/text()进行提取,会得到以下的结果:
1 | ['\n `] |
这是因为//li[@class="item-0"]/定位的位置为:
1 | ->| |<- |
而选取的区间内若出现其他节点,则会忽略这些节点,则在第一个li节点,选取的文本的范围为a节点尾标签到li节点尾标签之间的文本——无文本,则没有返回结果;第二个li节点,有换行符与下一行的多个缩进符
因此,如果想要获取li节点内部的文本,有两种方式
一种是选选取a节点再获取文本
2
>
另一种是使用
//
2
>
7、属性匹配
属性多值匹配
用class属性匹配li节点,获得其下的a节点的文本
1
<li class="li li-first"><a href="link.html">first item</a></li>
如果使用
//li[@class="li",会无法匹配,这时需要用contain( )函数1
html.xpath('//li[contains(@class, "li")]/a/text()')
多属性匹配
根据多个属性确定一个节点,需要匹配多个属性,将多个属性匹配用and连接
例如,用class属性和name属性选择 li 节点
1
<li class="li li-first" name="item"><a href="link.html">first item</a></li>
XPath表达式
1
html.xpath('//li[contains(@class, "li") and @name="item"]/a/text()')
8、按顺序选择
1 | text = ''' |
9、节点轴选择
1 | text = ''' |
3.2. 使用Beautiful Soup
Beautiful Soup支持的解析器:
| 解析器 | 使用方法 |
|---|---|
| Python标准库 | BeautifulSoup(markup, ‘html.parser’) |
| lxml HTML解析器 | BeautifulSoup(markup, ‘lxml’) |
| lxml XML解析器 | BeautifulSoup(markup, ‘xml’) |
| html5lib | BeautifulSoup(markup,’html5lib’) |
基本用法:
1 | from bs4 import BeautifulSoup |
3.2.1. 节点选择器
1、选择元素
在BeautifulSoup对象后用 “.” 直接连接节点名即可
1 | soup.nodename |
嵌套选择
在选择了某个节点后,还想基于该节点往下继续选择其子节点或子孙节点,则可以进行嵌套选择
1
2
3
4html = """
<html><head><title>The Dormouse's story</title></head>
<body>
"""
基于head节点获取title节点:`soup.head.title`
关联选择
在做选择的时候,有时候不能做到一步就选到想要的节点元素,需要先选中某一个节点元素,然后以它为基准再选择它的子节点、父节点、兄弟节点
(1)子节点和子孙节点
获取直接子节点可以调用contents属性
1
2
3
4
5
6
7
8
9
10
11
12
13
14
15
16
17
18html = """
<html>
<head>
<title>The Dormouse's story</title>
</head>
<body>
<p class="story">
Once upon a time there were three little sisters; and their names were
<a href="http://example.com/elsie" class="sister" id="link1">
<span>Elsie</span>
</a>
<a href="http://example.com/lacie" class="sister" id="link2">Lacie</a>
and
<a href="http://example.com/tillie" class="sister" id="link3">Tillie</a>
and they lived at the bottom of a well.
</p>
<p class="story">...</p>
"""获取p节点的所有直接子节点
1
2
3
4
5soup.p.contents
['\n Once upon a time there were three little sisters; and their names were\n ', <a class="sister" href="http://example.com/elsie" id="link1">
<span>Elsie</span>
</a>, '\n', <a class="sister" href="http://example.com/lacie" id="link2">Lacie</a>, '\n and\n ', <a class="sister" href="http://example.com/tillie" id="link3">Tillie</a>, '\n and they lived at the bottom of a well.\n ']可以看到返回的结果是列表形式
也可以用children属性得到响应的结果
1
2for i, child in enumerate(soup.p.children):
print(i, child)如果想要得到所有的子孙节点,可以调用descendants属性
1
2for i, child in enumerate(soup.p.descendants):
print(i, child)(2)父节点和祖先节点
parent属性:获取某个节点的父节点
1
soup.a.parent
parents属性:获取所有祖先节点
1
soup.a.parents
(3)兄弟节点
获取同级的节点
- next_sibling:下一个兄弟节点
previous_sibling:上一个兄弟节点
next_siblings:后面的所有兄弟节点
previous_siblings:前面的所有兄弟节点
2、提取信息
选择好节点后,需要获得该节点的信息
1 | soup.nodename.atrrs['attr1'] |
3、获取文本内容
1 | soup.nodename.string |
3.2.2. 方法选择器
- find_all ( )
查询所有符合条件的元素
1 | find_all(name,attrs,recursive,text) |
name 按照节点名来查询,例如:
name="ul"attrs 按照属性来查找,例如:
attrs={'id':'list-1'}text 用来匹配节点的文件,可以是字符串也可以是正则表达式对象,例如:
attrs='abc'或attrs=re.compile('.*?')
- find ( )
find( )方法返回第一个匹配的元素
还有许多其他的查询方法,其用法与前面提到的find_all( )、find( )方法完全相同,只不过查询范围不同
find_parents( )和find_parent( )
find_next_siblings( )和find_next_sibling( )
find_previous_siblings( )和find_previous_sibling( )
find_all_next( )和find_next( )
find_all_previous( )和find_previous( )
3.3. 使用pyquery
如果你比较喜欢用CSS选择器,如果你对jQuery有所了解,那么有一个更适合你的解析库 —— pyquery
3.3.1. 初始化
1、字符串初始化
1 | from pyquery import PyQuery as pq |
2、URL初始化
1 | from pyquery import PyQuery as pq |
与下面的功能相同:
1 | from pyquery import PyQuery as pq |
3、文件初始化
1 | from pyquery import PyQuery as pq |
3.3.2. 基本CSS选择器
1 | html = ''' |
3.3.3. 查找节点
1、子节点
查找子节点需要用到find( )方法,此时传入的参数是CSS选择器
1 | from pyquery import PyQuery as pq |
find( )的查找范围为节点的所有子孙节点
如果我们只想找子节点,需要使用children( )方法
1 | lis = items.children('.active') # 筛选子节点中class为active的节点 |
2、父节点
parent( ) 方法:获取某个节点的父节点
1 | items.parent() |
parents( ) 方法:获取所有祖先节点
1 | items.parents() |
3、兄弟节点
siblings( )方法:获取兄弟节点
1 | items.siblings() |
4、遍历
pyquery的选择结果可能是多个节点,对于多个节点的结果,我们需要遍历来获取。需要用到items( )方法:
1 | from pyquery import PyQuery as pq |
3.3.4. 获取信息
1、获取属性
调用attr( ) 方法
1 | a.attr('href') |
当选中多个元素,然后调用attr( )方法,只会返回第一个元素的属性,如下:
1 | html = ''' |
这时,如果想要获取所有a节点的属性,需要用到前面提到的遍历:
1 | from pyquery import PyQuery as pq |
2、获取文本
text( )方法:获取内部的文本
html( )方法:获取内部的HTML文本
4. 文件存储
4.1. JSON
一个JSON对象:
1 | [{ |
注意:JSON数据需要用双引号包围
- 读取JSON数据
1 | import json |
JSON对象其实可以看作是一个列表,要获取JSON对象中的内容,使用列表的索引即可
1 | # 以下两种方法均可以获得键值 |
- 输出JSON
可以调用 dump( )方法,将JSON对象转化为字符串
1 | json.dump(data) |
如果想保存JSON格式,可以再加一个参数indent,代表缩进字符个数
1 | json.dump(data, indent=2) |
如果JSON中包含中文字符,还需要指定参数 ensure_ascii 为 False,另外还要规定文本输出的编码:
1 | with open('data.json', 'w', encoding='utf-8') as f: |
4.2. CSV
- 写入
1 | import csv |
默认以逗号分隔,可以指定分隔符,需要传入 delimiter 参数
1 | writer = csv.writer(f,delimiter=" ") # 初始化写入对象,以空格作为分隔符 |
一般情况下,爬虫抓取的都是结构化数据,一般会用字典表示,在csv库中也提供了字典的写入方式:
1 | import csv |
参考资料:
(1) 崔庆才 《Python3网络爬虫开发实战》
(2) 简书:Splash使用初体验